LakeNormanMommies: Fitness Friday: Choosing the Right Exercise Routin...: Choosing The Right Exercise Routine Made Easy Whether you are just starting back to exercise after time off or exercising for the very fi...
Check out my post on Lake Norman Mommies!
Friday, April 19, 2013

Thursday, March 28, 2013
Create a Pain Free and Strong Body
I had written this article for City Unwrapped Magazine but wanted to share it with everyone here as well. Hope you find this helpful!
It seems that I run across people complaining of knee pain, shoulder pain, or neck and back pain more than ever these days. When I start to examine the cause it usually stems from improper alignment while doing exercises or day to day activities. My goal as a Pilates Instructor is to teach individuals how to correct and prevent pain or to keep it from happening at all.
Sitting Straight Does Make a Difference
With all the time we spend on the computer, in our cars, sitting behind a desk, etc. we need to start paying attention to how our bodies are working while doing those routine tasks. I find most people slump over their computers or steering wheels and settle their bodies into a place that causes undue stress on the back, neck and shoulders. Just making a few adjustments to how we sit can help build a stronger foundation and take the pressure off these areas. While sitting in a chair take note where the torso aligns over the hips and sitz bones. If the tail bone is tucked under your body and the frame of the torso (back ribcage) is behind the hips you are putting too much stress on the lumbar spine and the internal organs. This pressure over time will cause a weakened core and create poor posture as well as low back pain. Just sitting up taller and opening the tail bone to the back of the chair will bring the torso more in line to sit on the frame of the pelvis and hips which creates more stability. Also don’t forget to activate the internal core muscles to help strengthen the back as well. When our mothers told us to stop slouching and sit up straight we should have listened!
Be Aware Of Your Shoulders
Next, when sitting while working or eating we tend to slump over and round the shoulders and upper back which again will put undue pressure on the neck and upper back. This poor posture will literally be a pain in the neck if not corrected. Instead of rounding the upper body, sit tall with an open tail bone and hinge forward through the hip crease to lean towards the desk or table. Always think shoulders back and down (I know it sounds funny but I tell my clients “heavy armpits, shoulders loose” and it works!) Just being aware of where our bodies are sitting will make a huge difference in how we feel at the end of the day. At first this may be hard to remember but stick with it!
Proper Alignment During Exercise is Key
Of course the way we exercise can cause just as many issues if we do not think about where our bodies are lined up. These days of the ‘extreme’ boot camps and fast paced routines we do not allow ourselves to make sure we align our neck, knees, and shoulders in the right place. One of the most common positions I see executed poorly is the all 4 balance and plank position. To set up properly in the all 4 position make sure that your wrists line up under your shoulders and knees line up under the hips. Have someone help spot you a few times so that you start to “feel” the correct position. Most people line up where it is comfortable not necessarily in the correct place. Having the arms and knees in the proper place
creates a strong base that will help to stabilize the body better when you balance or come into plank. Keep the head in line with the spine and soften through the shoulders and upper back. I see numerous people that round too much here and keep their head either too high or too low which puts too much pressure on the neck. If you can, have someone place a foam roller or yard stick lined up down your spine running from the back of the head to the tail bone making sure all parts of the back and head touch the roller. Once the body is positioned correctly you have created a strong base ready for anything!
Remember, take care of your body, it’s the only one you get!
It seems that I run across people complaining of knee pain, shoulder pain, or neck and back pain more than ever these days. When I start to examine the cause it usually stems from improper alignment while doing exercises or day to day activities. My goal as a Pilates Instructor is to teach individuals how to correct and prevent pain or to keep it from happening at all.
Sitting Straight Does Make a Difference
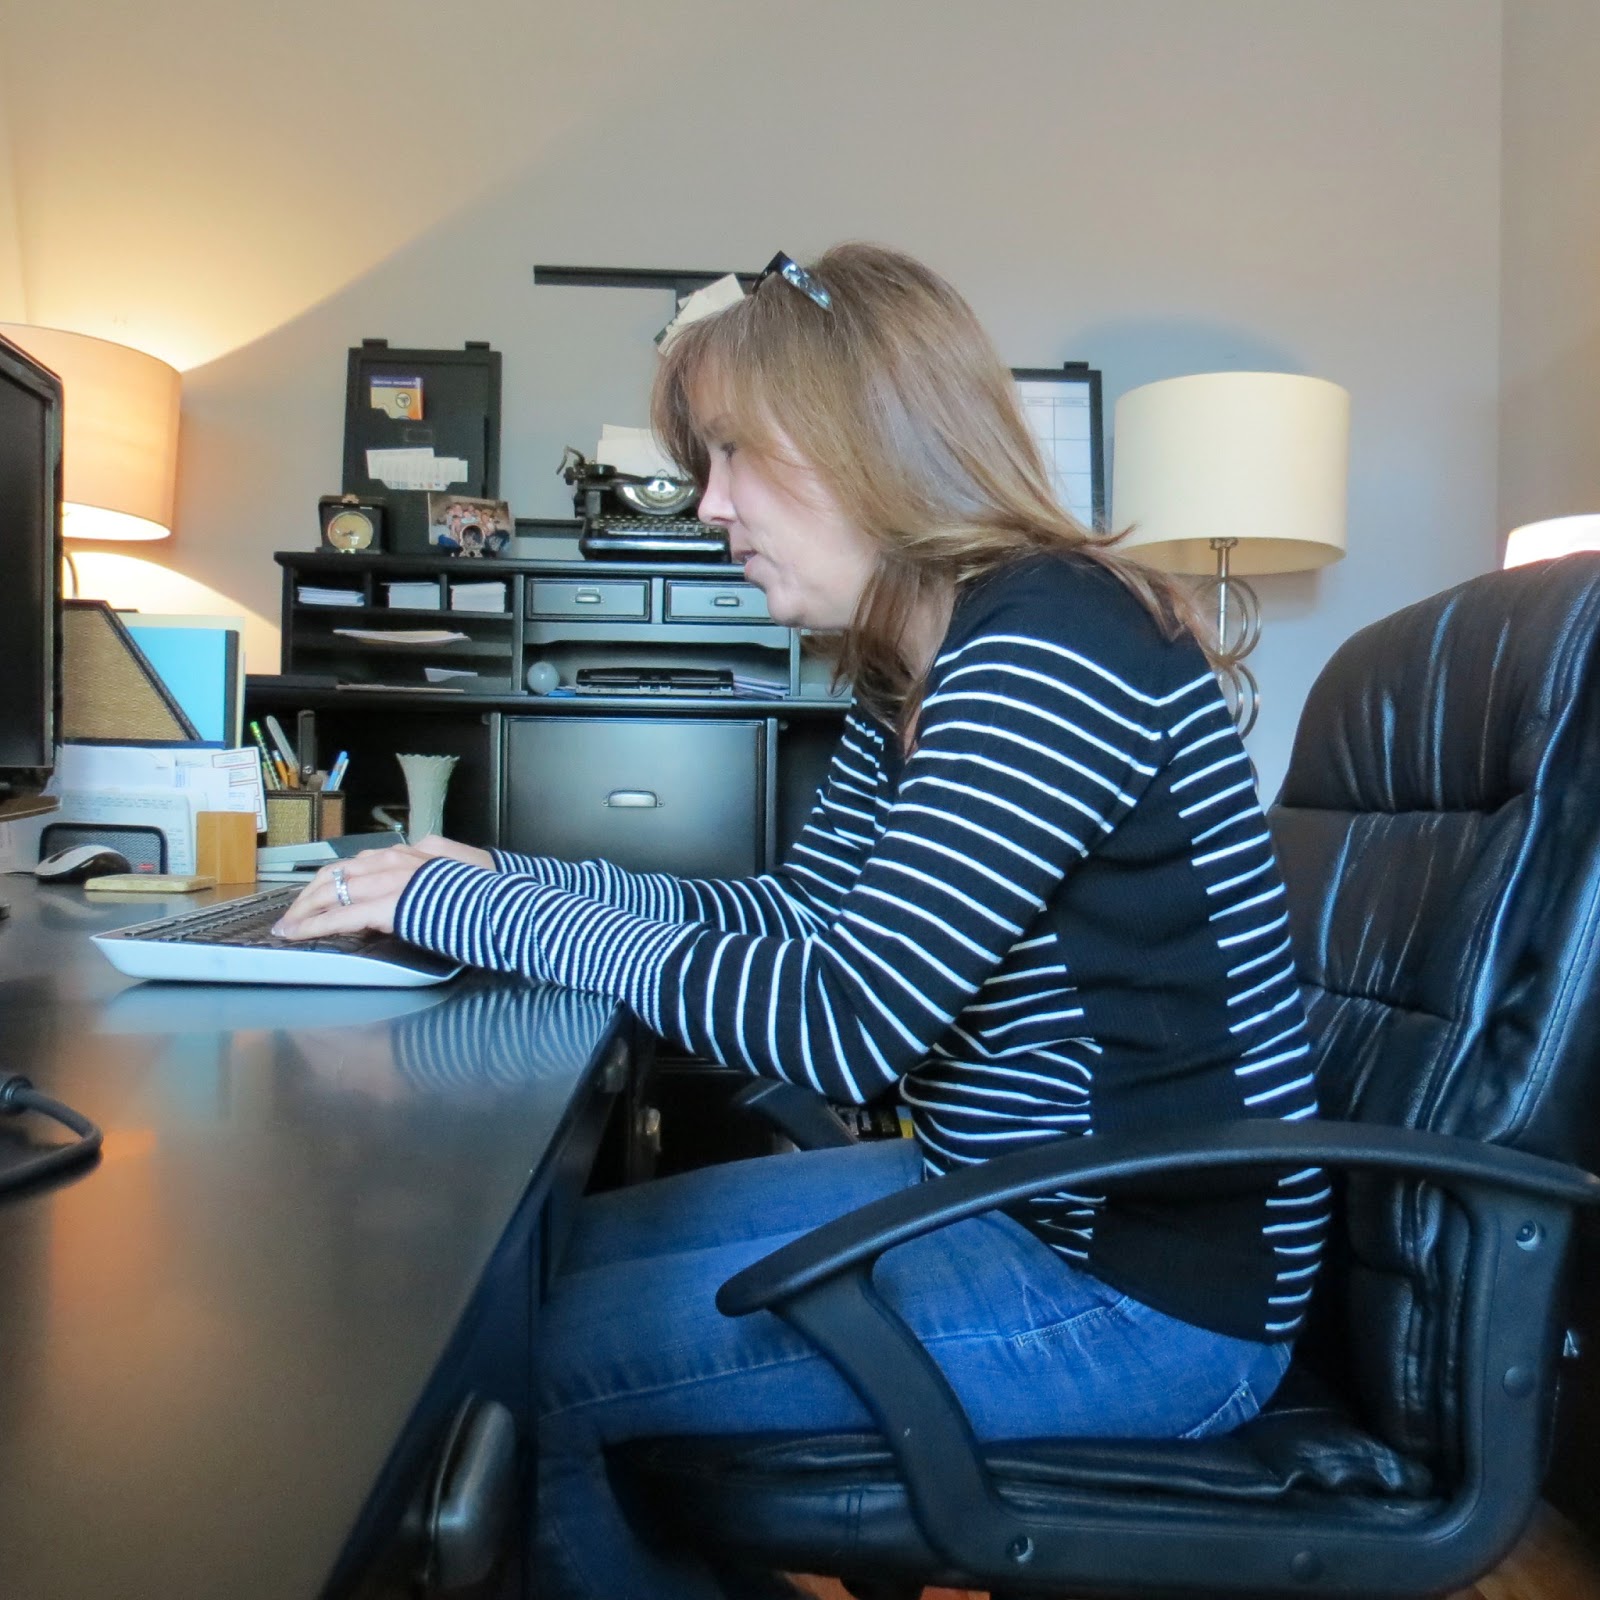 |
| Poor computer posture. |
 |
| This is better! |
Next, when sitting while working or eating we tend to slump over and round the shoulders and upper back which again will put undue pressure on the neck and upper back. This poor posture will literally be a pain in the neck if not corrected. Instead of rounding the upper body, sit tall with an open tail bone and hinge forward through the hip crease to lean towards the desk or table. Always think shoulders back and down (I know it sounds funny but I tell my clients “heavy armpits, shoulders loose” and it works!) Just being aware of where our bodies are sitting will make a huge difference in how we feel at the end of the day. At first this may be hard to remember but stick with it!
Proper Alignment During Exercise is Key
 | |
| Improper alignment in the all 4's position. |
 |
| Much better, stable base! |
creates a strong base that will help to stabilize the body better when you balance or come into plank. Keep the head in line with the spine and soften through the shoulders and upper back. I see numerous people that round too much here and keep their head either too high or too low which puts too much pressure on the neck. If you can, have someone place a foam roller or yard stick lined up down your spine running from the back of the head to the tail bone making sure all parts of the back and head touch the roller. Once the body is positioned correctly you have created a strong base ready for anything!
Remember, take care of your body, it’s the only one you get!
Wednesday, March 27, 2013
Certified Pilates Instructor Needed!
Dancing Moon Pilates is looking for a Comprehensive Certified Pilates Instructor. Qualified candidates must submit a resume and will be asked to teach a session to the owners. Having experience on Balanced Body equipment is preferred. Call or email for more details!
Wednesday Blues
Today was a long day and I just kept telling myself Friday will be here soon! We are heading to Disney for spring break and can't wait to take youngest to see all the sites.
 In my quest to get everything done, organized, and clean before we leave I have been in DIY overload. One of my most recent fun DIY projects came out of my need to turn a broken item into something useful. I had purchased 2 hanging wall candle holders from Kohl's several weeks ago. In one I added some shells found on vacation last year in Maine with a candle. The other must have gotten a crack in the top glass and the whole top handle came off in my hands. I never got around to taking it back to the store and I decided to do something with it.
The the way it's suppose to be used!

The top that came off the other one. I have a use for this part in another DIY project...stay tuned!
I have been inspired by all the terrariums on Pinterest and in stores and wanted to try doing one myself so I decided to use the broken candle holder. On one of my walks around the neighborhood I picked up a large piece of River Birch bark laying in the park and thought "I can use this for something".

The large piece of bark that gave me the idea. I found more in my back yard from my River Birch tree.

When I was in Home Depot I saw they had their succulents buy 5 get one free and bought one of each type. Using the bottom part of the candle holder I filled it with dirt and added the plants.

I wanted to cover the bottom part of the glass with the bark to hide some of the dirt and used a hot glue gun to adhere the bark.

All finished! I loved the way it turned out. I placed this on the table in my front entry way. I am making more with bark I found at my friend Laurie's house and some $2.00 vases I found at Habitat. Anybody want one?
In my quest to get everything done, organized, and clean before we leave I have been in DIY overload. One of my most recent fun DIY projects came out of my need to turn a broken item into something useful. I had purchased 2 hanging wall candle holders from Kohl's several weeks ago. In one I added some shells found on vacation last year in Maine with a candle. The other must have gotten a crack in the top glass and the whole top handle came off in my hands. I never got around to taking it back to the store and I decided to do something with it. The the way it's suppose to be used!
The top that came off the other one. I have a use for this part in another DIY project...stay tuned!
I have been inspired by all the terrariums on Pinterest and in stores and wanted to try doing one myself so I decided to use the broken candle holder. On one of my walks around the neighborhood I picked up a large piece of River Birch bark laying in the park and thought "I can use this for something".
The large piece of bark that gave me the idea. I found more in my back yard from my River Birch tree.
When I was in Home Depot I saw they had their succulents buy 5 get one free and bought one of each type. Using the bottom part of the candle holder I filled it with dirt and added the plants.
I wanted to cover the bottom part of the glass with the bark to hide some of the dirt and used a hot glue gun to adhere the bark.
All finished! I loved the way it turned out. I placed this on the table in my front entry way. I am making more with bark I found at my friend Laurie's house and some $2.00 vases I found at Habitat. Anybody want one?
Tuesday, March 19, 2013
Skinny Chicken Salad...Yum


If you have never had a garden before give it a try, it's fun and so satisfying when you get to eat that first tomato, bean or pepper. Make sure you start with good organic compost or garden soil!
Here is Tuesday's Recipe!
I ran across this recipe on Pinterest. It is very close to the way I have made chicken salad for years so I had to check it out. The biggest difference is adding Greek Yogurt instead of the mayo and the cranberries. It's yummy!Harvest Chicken Salad
Recipe by Chung-Ah of Damn Delicious

Ingredients:
- 1 pound chicken breast (chopped, diced, or shredded)
- 1/2 cup diced red onion
- 1/2 cup diced apple
- 2/3 cup grapes, halved
- 1/3 cup Dried Cranberries
- 1/4 cup sliced almonds
- 1/2 cup Greek yogurt
- 1 1/2 TBSP freshly squeezed lemon juice
- 1/2 tsp garlic powder
- Kosher salt and freshly ground black pepper, to taste
- Ciabatta bread, toasted, for serving
Directions:
In a large bowl, combine chicken, red onion, apple, grapes, cranberries, sliced almonds, Greek yogurt, lemon juice, garlic powder, salt and pepper, to taste. Serve sandwiches on ciabatta bread with chicken salad mixture.
In a large bowl, combine chicken, red onion, apple, grapes, cranberries, sliced almonds, Greek yogurt, lemon juice, garlic powder, salt and pepper, to taste. Serve sandwiches on ciabatta bread with chicken salad mixture.
Note: You can also serve this over baby spinach for a delicious lunch salad!
Monday, March 18, 2013
Happy Monday!
Hope everyone got out and enjoyed the awesome weekend. I worked in the garden all weekend and can't wait for the veggies to come in!
Don't forget our Magic Circle Master class is this Saturday at 10:00, call for more details or to sign up for class.

Don't forget our Magic Circle Master class is this Saturday at 10:00, call for more details or to sign up for class.
Thursday, March 14, 2013
DIY Painted Curtains
I'm still on my quest to remodel rooms one by one. Currently I am changing my Kitchen and Breakfast area. I decided that I wanted to get rid of the table and chairs in our bay window/breakfast area and turn it into a cozy room to have coffee and read the paper. The curtains in the bay window had been purchased at Target several months ago just to have something on the windows. Since I was not sure at the time how the room would evolve I bought very cheap ($10-15 a panel) off white curtains that would go with anything. Once I got all the furniture in the area the way I wanted the curtains just were not doing it for me anymore. I could not find any fabric that I really liked and did not want to spend more money on ready made curtains, so I go the brilliant idea to paint the curtains I had.
I went to the craft store and bought some acrylic paint in red, yellow, black and cream. I ran across some foam stamps that I had bought years ago and thought the patterns would work well for my cozy room. I played with colors and stamps on some drawing paper to give me some ideas of what I thought may work before putting anything on the actual curtains. Once I felt ready to start I laid out a large cutting board on a flat surface, mixed the paint on some plastic plates and started applying paint to the stamps and started the pattern.


Success! Continue until you have the pattern, and colors you are looking for. Let the curtains dry before hanging them back up. The acrylic paint does not take long to dry. I was able to finish and hang 5 panels in just a few hours. The paint cost about $5.00 a jar. I love how they turned out and now I have original curtains for around $20.00.

 |
| The curtain panels before. |
 |
| The curtain panels after. |
I went to the craft store and bought some acrylic paint in red, yellow, black and cream. I ran across some foam stamps that I had bought years ago and thought the patterns would work well for my cozy room. I played with colors and stamps on some drawing paper to give me some ideas of what I thought may work before putting anything on the actual curtains. Once I felt ready to start I laid out a large cutting board on a flat surface, mixed the paint on some plastic plates and started applying paint to the stamps and started the pattern.
My husband thought I have bought big jars of Ketchup and Mustard!
Everything ready to go, the first stamps went on well.
Make sure you cover the stamp with paint, I used a small artist brush to apply the paint. Be careful not to get the paint in the creases or it will show when you press down.
Apply a little pressure, not too hard, and carefully lift the stamp off the fabric.
Success! Continue until you have the pattern, and colors you are looking for. Let the curtains dry before hanging them back up. The acrylic paint does not take long to dry. I was able to finish and hang 5 panels in just a few hours. The paint cost about $5.00 a jar. I love how they turned out and now I have original curtains for around $20.00.
Subscribe to:
Posts (Atom)